Android SDK
Android SDK Instructions
Effortlessly add push notifications to your Android application using Android Studio. This guide will walk you through including the SDK, setting it up correctly, and following recommended practices for optimal configuration and customization.
Overview
Engaging users and maintaining retention on Android apps is greatly supported by push notifications. They provide instant updates, reminders, and customized messages, enhancing the overall experience. Hood uses Firebase Cloud Messaging (FCM) to offer reliable and dynamic push notification features.
Requirements
- Android 8.0+ device or emulator with google services installed
- Android Studio
- Firebase project configured
- Hood API Key from the Ocamba platform
1. Set up Firebase
Add Firebase to your Android project:
Follow the complete setup guide at Firebase Android Setup.
Step-by-step Firebase configuration:
- Go to Firebase Console
Visit firebase console.
- Create a project
Click “Get started”, enter project name, choose needed option, and click “Create project”.
- Add Android app
When your project opens, click “Add app” and choose the Android platform.

- Register your app
Enter your package name and click “Register app”.

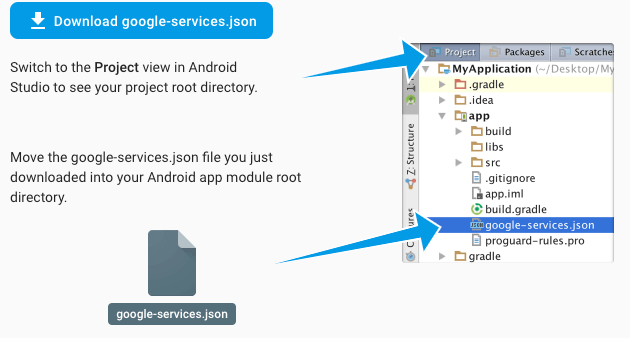
- Download google-services.json
Download the google-services.json file and place it in your app directory.
- Add Firebase SDK
Follow the instructions to add the Firebase SDK to your project.
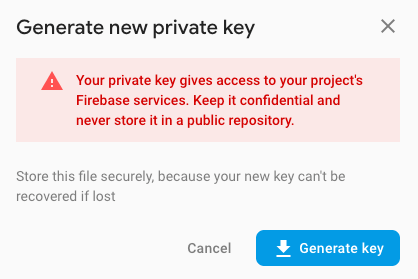
- Generate Service Account Key
Open project settings and generate a private key:
- Project settings → Service accounts
- Click “Generate New Private Key”, then confirm by clicking “Generate Key”
- Securely store the JSON file
- Upload to Ocamba Platform
Add the JSON file to the Ocamba platform under your app settings.
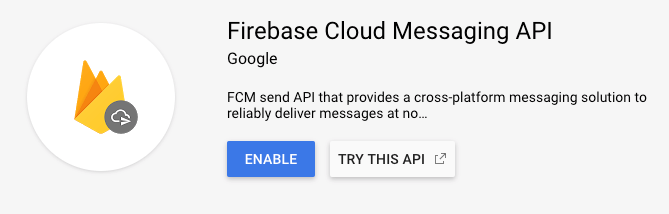
- Enable FCM API
Choose your project and enable the FCM API (if not already enabled)
2. Add Hood SDK
Add Maven Repository
Open project level build.gradle (allprojects) or settings.gradle (dependencyResolutionManagement) and add the following:
repositories {
    maven {
        url "https://maven.delsystems.net/public"
    }
}
Add Hood Dependency
Open app level build.gradle and add dependency:
For debug builds (with logs):
implementation 'com.ocamba:hoood-debug:25.10.8'
For release builds:
implementation 'com.ocamba:hoood:25.10.8'
3. Initialize Hood SDK
Create Application Class
Create a new Application class if you don’t have one already.
Register Application Class
Open your app’s AndroidManifest.xml and add name in the <application> tag:
Initialize Hood SDK
Choose one of the following initialization methods:
- Using AndroidManifest.xml
Add your API Key to AndroidManifest.xml:
<meta-data android:name="com.ocamba.ApiKey" android:value="YOUR_API_KEY" />
Then in your Application class:
OcambaHoood.getBuilder().init();
- Direct initialization
Initialize Hood directly with your API Key:
OcambaHoood.getBuilder().init("YOUR_API_KEY");

YOUR_API_KEY with your app’s API key from the Ocamba platform.OcambaHoood.getBuilder().init() inside the onCreate() method of your Application class.4. Analytics & Tracking
Enable Analytics
It’s the best method for effective analytics and reporting features use. After SDK is initialized, analytics is enabled by default. You can use analytics to track installs (install and screen view is collected by default) and other events. To add other event to analytics use:
OcambaHoood.getInstance().sessionEvent(String key);
OcambaHoood.getInstance().customSessionEvent(String key, JSON value);
Disable Analytics
If you want to disable analytics in the Application class add:
OcambaHoood.getBuilder().analytics(false).init();
Remote user identification
Sdk allows you to add unique user identification:
OcambaHoood.getInstance().setCustomerUserId("value");
Partner identification
Sdk allows you to set ID code of partner, based on which we know the client’s ID with that partner:
OcambaHoood.getInstance().setPartnerKeyId("value");
Utm
Add parameters to identify the campaigns that directs traffic. This feature can be used in a few ways:
OcambaHoood.getInstance().setUtm("key", "value");
//we will create “key” key with value “value“ in sdk storage

OcambaHoood.getInstance().getUtm("key");
//we will return value of key “key” from sdk storage

OcambaHoood.getInstance().removeUtm("key");
//key “key” replace will be removed from sdk storage
Track Custom Events
To track custom events in your app use following:
OcambaHoood.getInstance().track("key", "value");
This will create “key” key with value “value” in sdk storage.
To do same with parameters:
HashMap<String, Object> params = new HashMap<>();
params.put("key", "value");
OcambaHoood.getInstance().track(params);
//or
JSONObject jsonObject = new JSONObject();
jsonObject.put("key", "value");
OcambaHoood.getInstance().track(jsonObject);
All parameters will be saved locally until send track method is called:
OcambaHoood.getInstance().sendTrack();
Read track objects from sdk local storage:
OcambaHoood.getInstance().getTrack();
Read specific track object from sdk local storage:
OcambaHoood.getInstance().getTrack("key");
Remove track objects from sdk local storage:
OcambaHoood.getInstance().removeTrack();
Remove specific track object from sdk local storage:
OcambaHoood.getInstance().removeTrack("key");
Remove specific track object from user on Ocamba server:
OcambaHoood.getInstance().track("key", "");
OcambaHoood.getInstance().sendTrack();
5. Push notifications
Enable Push Notifications
By initializing the SDK, you can quickly and easily receive push notifications. Push is disabled by default. To use Hood push, add the following:
OcambaHoood.getBuilder().push().init();
If you want to receive a callback on initialization:
OcambaHoood.getBuilder().push().setPushResponse(new OcambaResponseCallback() {
    @Override
    public void onFailure(Exception e) {
        // Handle failure
    }

    @Override
    public void onResponse(int code, String response) {
        // Handle success
    }
}).init();
FCM Token
To read the user FCM token:
OcambaHoood.getInstance().getFcmToken();
Request Push Permission
For notifications to work on Android 13+, you need to request notification permission:
- Add Permission to AndroidManifest.xml
<uses-permission android:name="android.permission.POST_NOTIFICATIONS"/>
- Request Permission
Let the SDK handle the permission request:
OcambaHoood.getInstance().askForPushNotifications(true, new OcambaHoood.PromptForPushNotificationPermissionCallback() {
    	@Override
    	public void notificationsPermission(boolean accepted) {
            // Handle
    	}
    });
Or handle it manually and when user accepts permission call this method:
OcambaHoood.getInstance().notificationsPermissionAllowed();
6. Notification events
Default Push Behavior
By default, the Hood SDK will show a notification on the device’s notification area when a push is received. Tapping this notification will open the browser and track the conversion. We send custom intents when push notifications are received, opened, or dismissed.
If you have a specific use case for these scenarios, you will need to make a listener for these intents by creating a custom BroadcastReceiver.
- Create broadcast receiver
Create broadcast receiver which extends OcambaNotificationReceiver and override methods.
@Override
public void ocambaNewToken(String token, Context context) {
    //new token received
}

@Override
public void ocambaNotificationUser(RemoteMessage remoteMessage, Context context) {
    //users notification received
    if (remoteMessage.getNotification() != null) {
        Log.i(TAG, "Title: " + remoteMessage.getNotification().getTitle());
        Log.i(TAG, "Text: " + remoteMessage.getNotification().getBody());
    }
}

@Override
public void ocambaNotificationReceived(OcambaNotificationObject message, Context context) {
    //ocamba notification received
    Log.i(TAG, "Ocamba Received Notification: " + message.getObject());
}

@Override
public void ocambaNotificationClick(OcambaNotificationObject message, Context context) {
    //ocamba notification clicked
    Log.i(TAG, "Ocamba Received Notification: " + message.getObject());
}

@Override
public void ocambaNotificationDismissed(Context context) {
    //ocamba notification dismissed
}

@Override
public void ocambaNotificationActionButtons(String action, Context context) {
    //ocamba notification action buttons
}

@Override
public void ocambaNotificationCustomAction(String action, Context context) {
    //ocamba notification custom data
}

@Override
public void ocambaNotificationMultiMessageReceived(ArrayList multiMessageList, Context context) {
    //multimessage received
}
- Register broadcast receiver
Add Broadcast Receiver to application tags in AndroidManifest.xml
<receiver android:name=".YouReceiverName" android:enabled="true" android:exported="false">
    <intent-filter>
        <action android:name="PACKAGE_NAME.OCAMBA_NOTIFICATION_CLICK"/>
        <action android:name="PACKAGE_NAME.OCAMBA_NOTIFICATION_RECEIVED"/>
        <action android:name="PACKAGE_NAME.OCAMBA_NOTIFICATION_TOKEN"/>
        <action android:name="PACKAGE_NAME.OCAMBA_NOTIFICATION_USER"/>
        <action android:name="PACKAGE_NAME.OCAMBA_NOTIFICATION_ACTION_BUTTONS"/>
        <action android:name="PACKAGE_NAME.OCAMBA_NOTIFICATION_CUSTOM_ACTION"/>
        <action android:name="PACKAGE_NAME.OCAMBA_NOTIFICATION_DISMISSED"/>
        <action android:name="PACKAGE_NAME.OCAMBA_NOTIFICATION_MULTI_MESSAGE_RECEIVED"/>
    </intent-filter>
</receiver>
PACKAGE_NAME with yours package name.YouReceiverName with receiver name you created.- Add receiver to AndroidManifest.xml
<meta-data android:name="com.ocamba.OcambaReceiver" android:value="packageName.YouReceiverName" />
7. Use existing FCM
Enjoy the benefits of the Ocamba push service even if you are using FCM push notifications with your FirebaseMessagingService.
Create FirebaseMessagingService
@Override
public void onMessageReceived(RemoteMessage remoteMessage) {
    super.onMessageReceived(remoteMessage);
    OcambaHoood.getInstance().onMessageReceived(remoteMessage);
}

@Override
public void onNewToken(String token) {
    super.onNewToken(token);
    OcambaHoood.getInstance().pushToken(token);
}
Add service to AndroidManifest.xml
<service android:name=".NotificationReceiver">
    <intent-filter>
        <action android:name="com.google.firebase.MESSAGING_EVENT"/>
    </intent-filter>
</service>
8. Scheduled notifications
Scheduled notifications allows customers to show notification from time to time. This feature will increase user engagement over time. We added default title and text for this kind of notification. Click on it will open apps launcher activity.
Choose one of the following initialization methods:
Default initialization
OcambaHoood.getBuilder().scheduledNotification(1).init();
Custom initialization
OcambaHoood.getBuilder().scheduledNotification(1, "title", "description").init();
9. Basic customization
By default, the Ocamba receiver will show a notification on the device’s notification area when a content push is received. Tapping this notification will open the browser and track the open push conversion for you.
Custom notification click actions
- Update builder
To change notification click actions add to Application class:
OcambaHoood.getBuilder().getNotificationBuilder().customActionButtons();
- Add action
Open broadcast receveir and add custom actions:
@Override
public void ocambaNotificationClick(String message, Context context) {
    deepLink(context);
}

@Override
public void ocambaNotificationActionButtons(String action, Context context) {
    deepLink(context);
}
Custom notification layout
- Change notification icon
To change notification icon (from status bar) create inside drawable (res -> drawable) xml icon with name:
ocamba_nc_icon.xml
- Change notification color
To change notification elements color create inside colors (res -> values -> colors):
<color name="ocamba_nc_name_color">#006291</color>
<color name="ocamba_nc_text_color">#006291</color>
<color name="ocamba_nc_title_color">#DB0000</color>
- Change notification layout
To change notification layout add to Application class:
OcambaHoood.getBuilder().getNotificationBuilder().customLayout();
- Add layout
Open broadcast receveir and add custom actions:
@Override
public void ocambaNotificationReceived(OcambaNotificationObject message, Context context) {
    customLayout(context);
}
- Multimessage notification indicator
To change multimessage notification indicator icon create inside drawable (res -> drawable) xml icon with name:
ocamba_multimessage_indicator.xml
- Multimessage notification arrows
To change multimessage notification arrows icon create inside drawable (res -> drawable) xml icon with name:
ocamba_multimessage_arrow_next.xml
ocamba_multimessage_arrow_previous.xml
10. Advanced customization and click trackers
Create a completely custom notification, where your receive only data (JSON format) from sdk.
In this case, you need to take care of notification layout, intents, clicks, click tracker (in case you want them), etc.
Custom notification
- Update builder
To use custom notification clicks add following to Application class:
OcambaHoood.getBuilder().getNotificationBuilder().customTrack();
- Receive object
On ocambaNotificationReceived callback you will receive list of received notification object:
@Override
public void ocambaNotificationReceived(OcambaNotificationObject message, Context context) {
    Log.i(TAG, "Ocamba Received Notification: " + message.getObject());
    //from this object you can get impTracker, clickTracker, title, image, description, etc..
}
- Custom clicks
For custom click use:
OcambaRequest.getInstance().getTracker(message.getImpTracker(), new OcambaResponseCallback() {
    @Override
    public void onFailure(Exception e) {
        Log.e(TAG, "TRACKER onFailure(): " + e); e.printStackTrace();
    }

    @Override
    public void onResponse(int code, String response) {
        Log.i(TAG, "TRACKER response code: " + code + ", response: " + response);
    }
});
11. Testing
Test Push Notifications
- Build and run your app on a physical device
- Ensure the app is properly initialized
- Send a test notification from the Ocamba platform
- Verify the notification appears on the device
Troubleshooting
Notifications Not Appearing
- Verify Firebase configuration is correct
- Check that google-services.json is in the app directory
- Ensure FCM API is enabled in Firebase Console
- Verify notification permissions are granted
- Check debug logs for errors
Token Registration Issues
- Verify internet connectivity
- Check that Google Play Services are installed
- Ensure your API key is correct
- Review FCM token generation in logs
Need Help?
Contact our support team at [email protected] with:
- Details of the issue
- Your App ID
- Relevant logs or error messages
- Device information (Android version, manufacturer)
We’re happy to help!