Campaings
Introduction to Campaigns in Hood
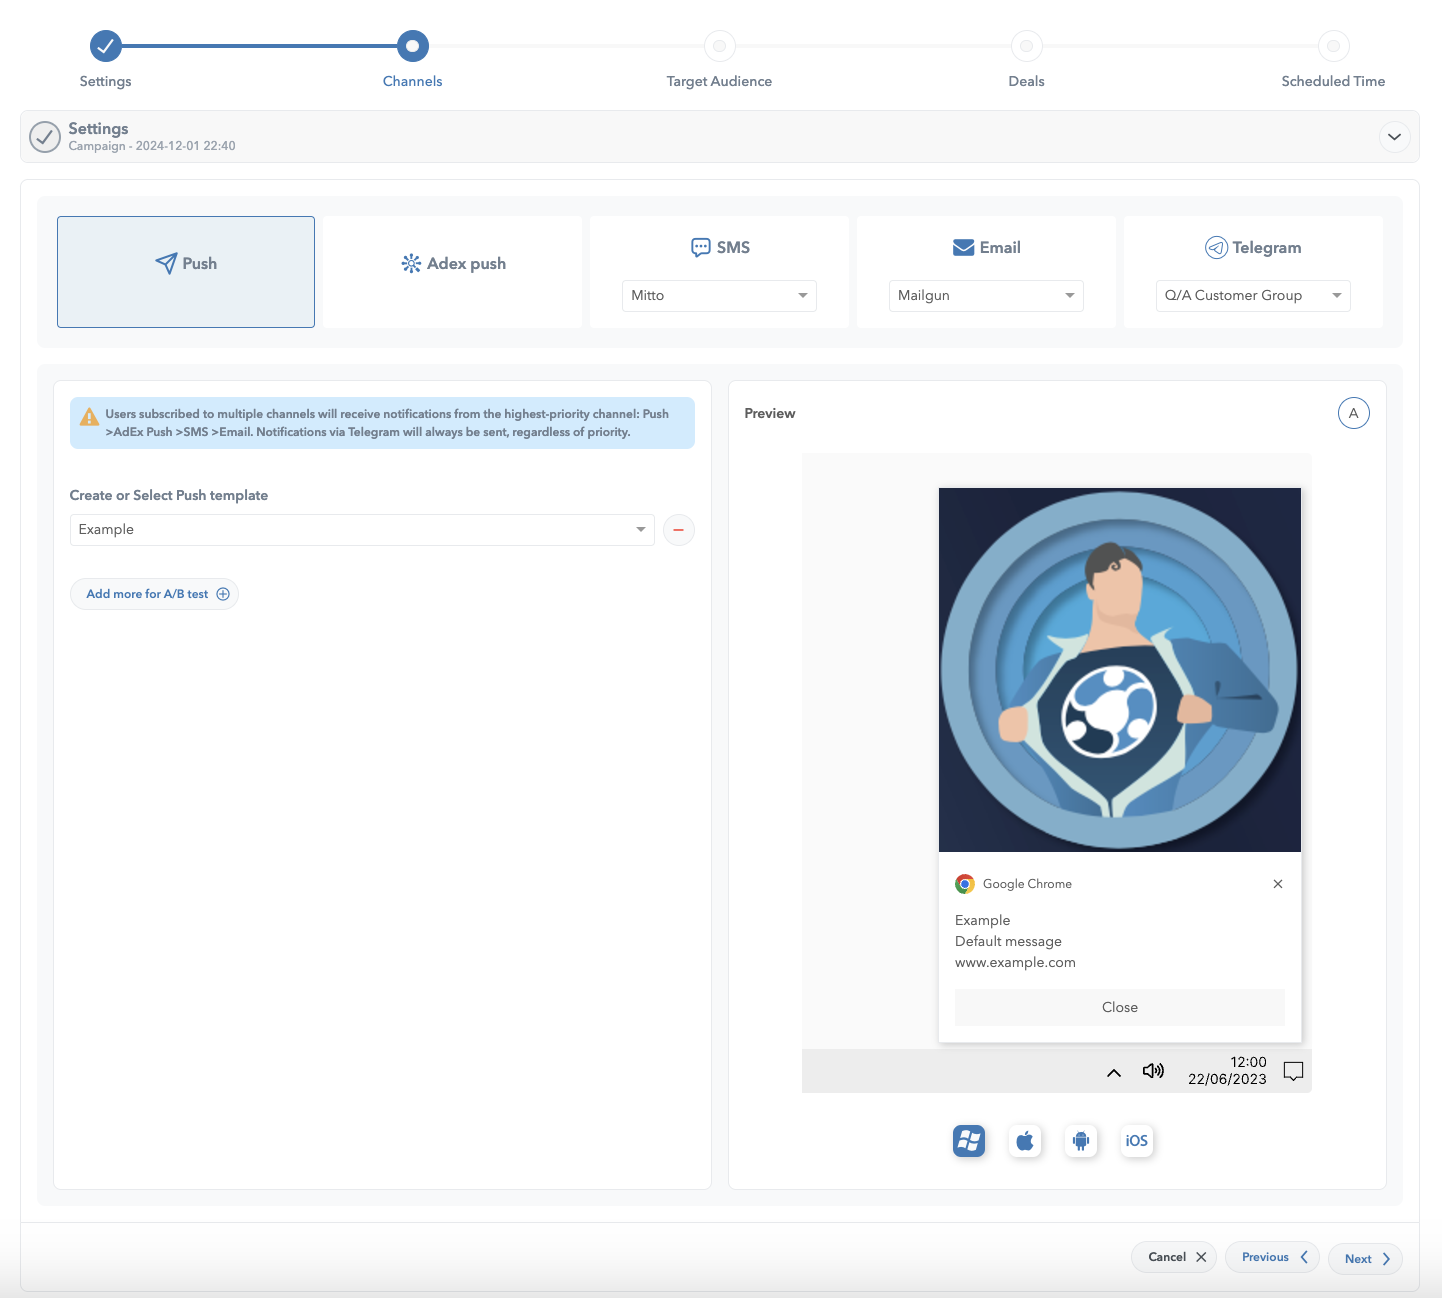
Channels Campaigns Selection
Campaigns in Hood provide a powerful way to engage your audience across multiple channels, including email, SMS, push notifications, and more.
With this tool, you can plan, schedule, and optimize your marketing efforts to reach your audience at the most effective times and through the most relevant channels.
This guide will walk you through how to set up and manage your campaigns, ensuring you can make the most out of the features available to enhance your marketing strategies.
Step 1: Setting Up the Basics
Naming Your Campaign
Start by giving your campaign a clear and distinctive name. This name will help you easily identify it in your reports and dashboards. Choose something descriptive that reflects the purpose or target of the campaign.

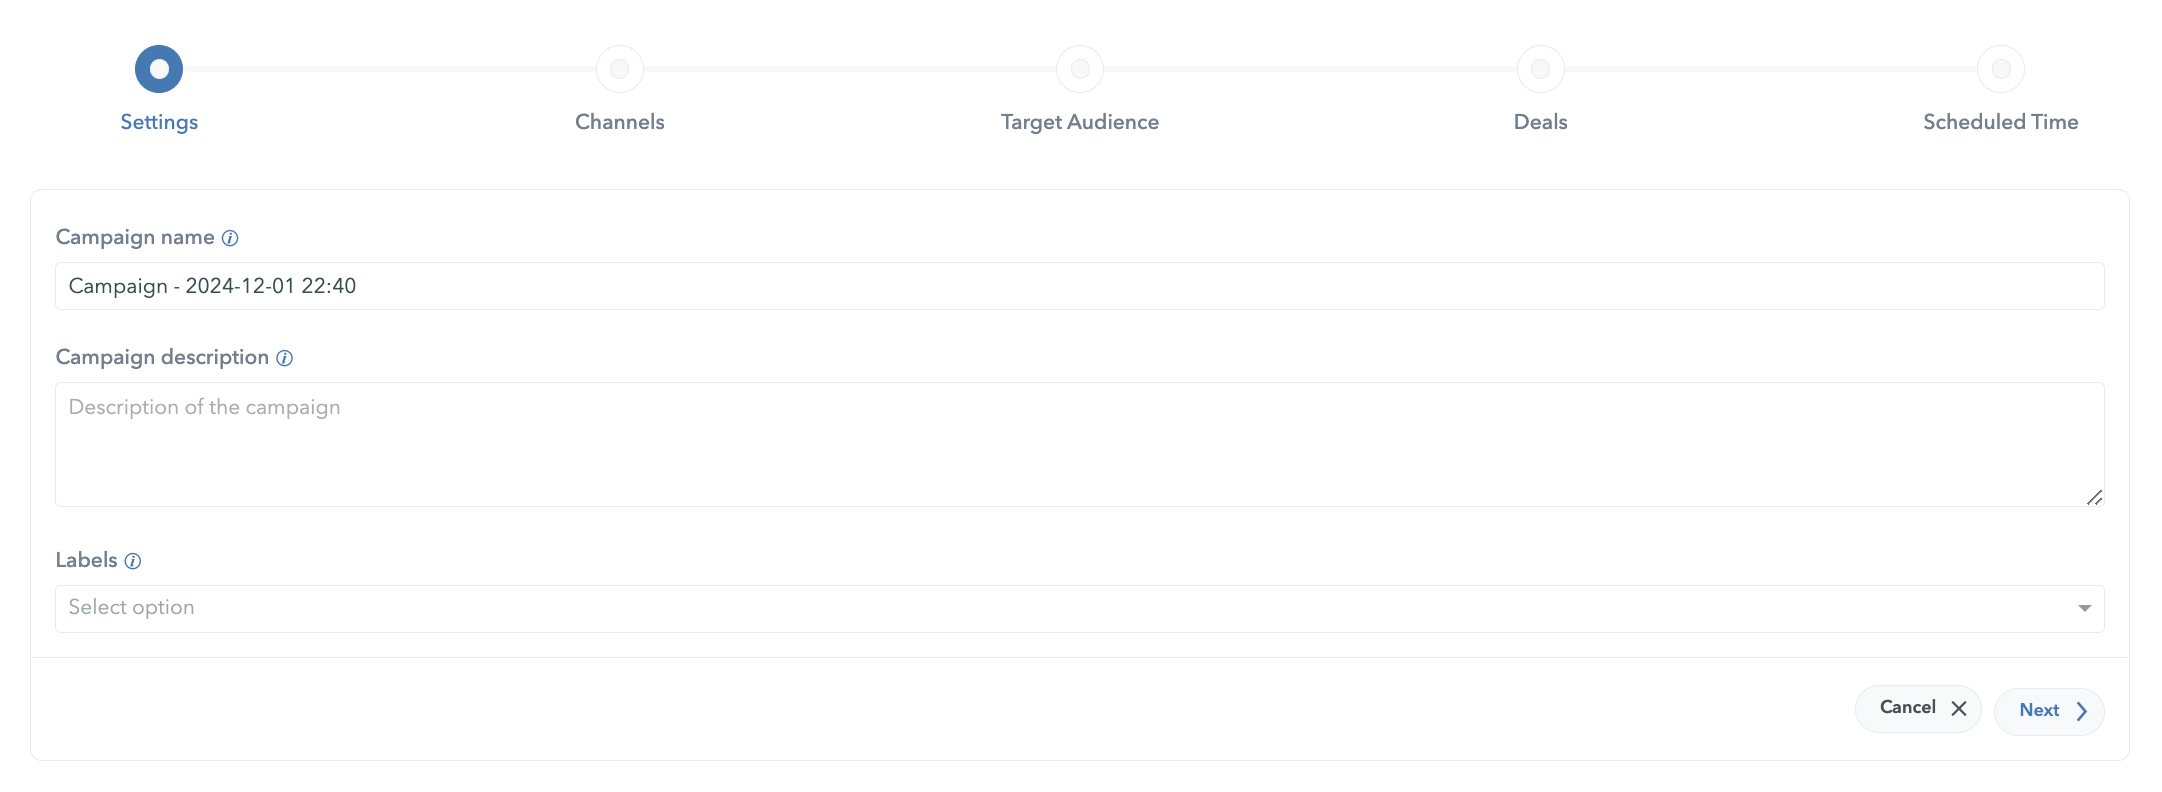
Basic settings of the Campaigns Scheduler
Describing Your Campaign
Next, provide a brief description of the campaign. This helps anyone viewing the campaign to quickly understand its goals and content.
A good description can be especially helpful when you have multiple campaigns running or when team members need to review the campaign’s purpose. The campaign description is optional.

Campaign Description Field
Setting Up Labels
Optionally, enter labels that will be used for sorting campaigns in the Campaigns list. Labels are added by a simple text input in the Labels field.

Campaign Labels Field
Users can perceive labels as tags used primarily in the first step of the campaign creation chain and when editing campaigns.
An example of labels can be “Sneakers” or “New Shoes” for a campaign promoting new sneakers. Labels are always optional but very useful, especially when managing many campaigns at once.
Proceeding to the Next Step: Channel Selection
In the next part of the guide, we’ll cover how to choose and configure the channels through which your campaign will be delivered. Whether you’re using email, SMS, push notifications, or a combination of these, the channel selection step will ensure that your campaign is delivered through the most effective mediums for your target audience.
Step 2: Selecting Channels for Your Campaign
In this step, you’ll choose the communication channels through which your campaign will reach your audience. Hood offers multiple channels to ensure your message is delivered in the most effective way possible, based on the preferences and behaviors of your target audience.
Choosing Your Channels
You can select one or more channels to deliver your message. The available options include:
- Push Notifications: Ideal for delivering quick, engaging messages directly to a user’s device.
- Adex Push: Targeted push notifications through the Adex platform.
- SMS: Direct text messages that can reach users even without an internet connection. Choose your SMS provider, such as Twilio, from the dropdown menu.
- Email: A traditional yet effective way to communicate detailed messages.
- Telegram: Perfect for customer support and group-centric engagement. Users are able to send messages to previosuly configured Telegram groups. Sending messages directly to individual users is currently unavailable.

An Example of All Avaialable Channels in Campaings
Selecting the appropriate channels is crucial for maximizing your campaign’s effectiveness. Consider your audience’s habits and preferences when deciding which channels to use.
Creating or Selecting a Template
For all available channels, you can either create a new template or select an existing one. Templates ensure consistency in your messaging and save time when setting up multiple campaigns.
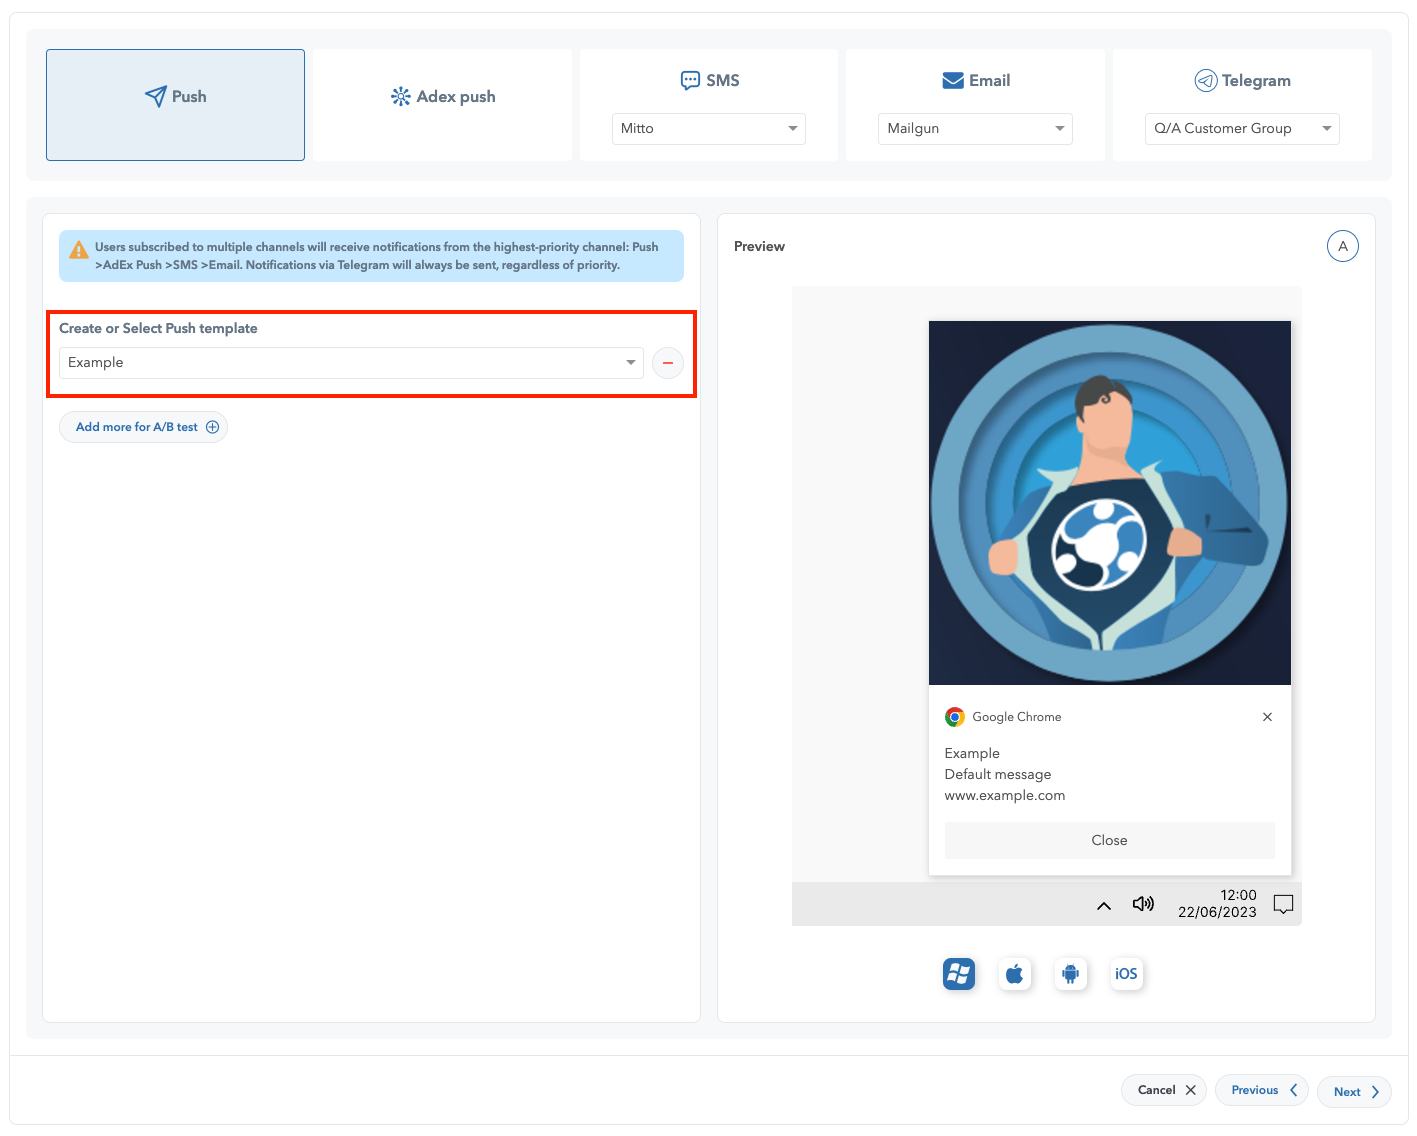
Create or Select Template Field Location
Hood’s campaign scheduler allows multi-channel coordination. To send messages from multiple channels at once, first select the channel, select the provider if required (only applicable to SMS and Email), and then select the message template.
The indicator that the channel has been activated and scheduled for sending is the green frame around the channel icon. An example of scheduling with all four channels being set correctly can be seen in the image below.
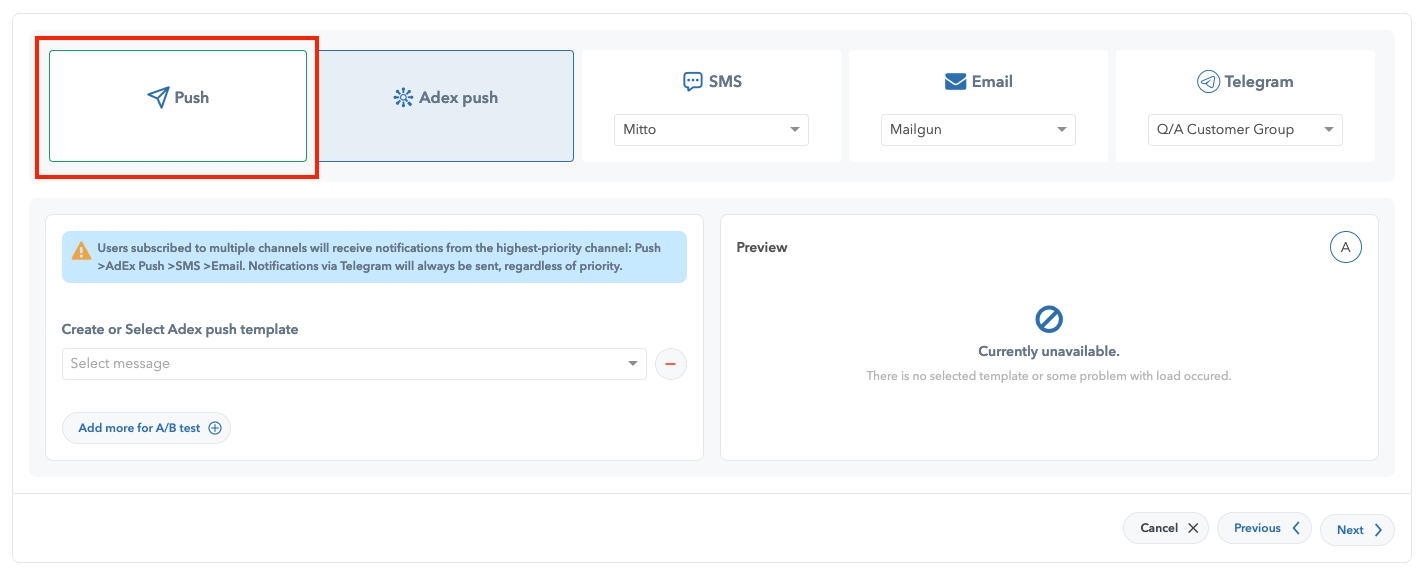
Push Channel Green-Squared and Set to Ready
A/B Testing
If you want to test different versions of your message to see which performs better, you can set up an A/B test. This is useful for optimizing content before a full rollout.
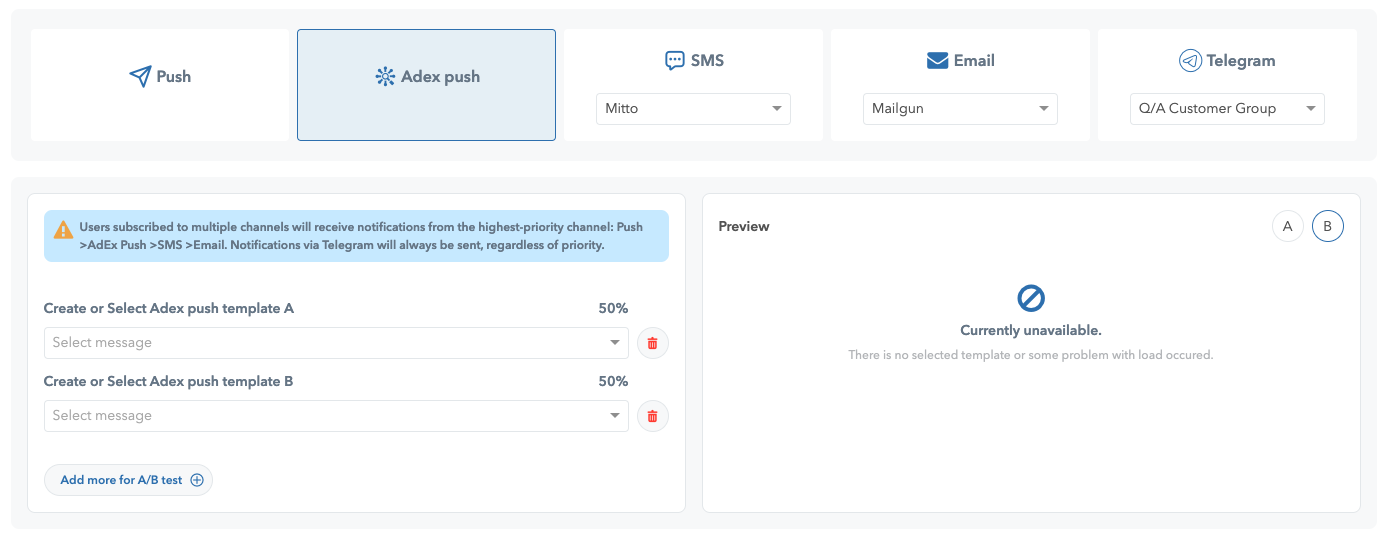
An Example of Selected Message Preview
The maximum number of A/B Tests allowed is four and the minimum is two. Once the A/B Test toggle is enabled, the system will provide you with two templates (25% distribution), and as the Add more for A/B test is selected, additional A/B test variations will be added. The next A/B test variation will provide 33% distribution, and the final one, if added, will provide 25%, making a total of four available.
Above the message preview display window, all selected A/B test variations will be available, sorted from A to D. Selecting the appropriate letter of variation will present the corresponding preview as per your selection on the left side.

Template Preview
As you design your campaign, a live preview will show you exactly how your message will appear on a recipient’s device. This feature helps ensure that your message is visually appealing and free from errors before it is sent out.
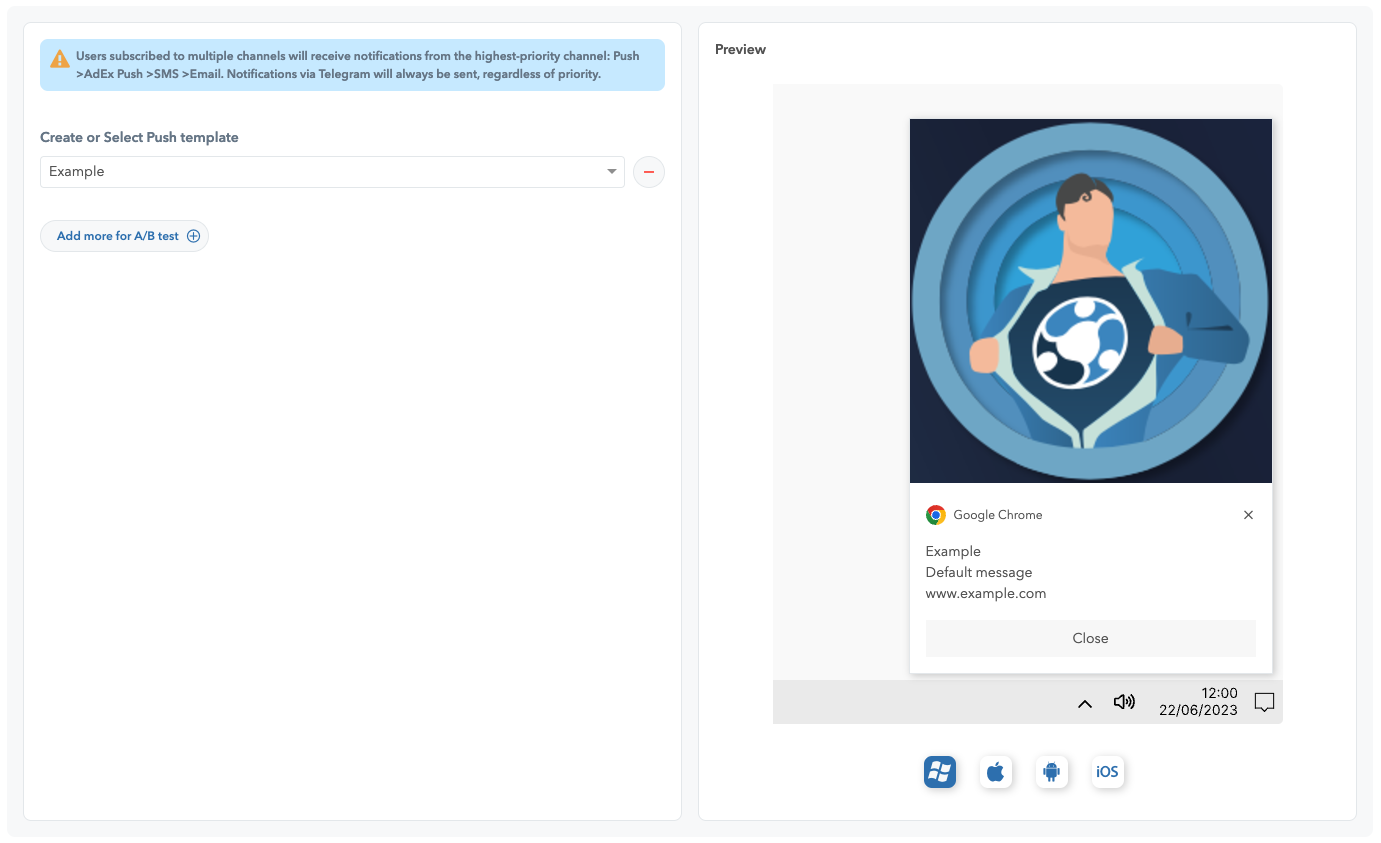
Message Preview Push Example as Seen on the Right
Reviewing Previous Steps
As you work through this step, you’ll notice collapsed panels summarizing the settings from previous steps (Basic Settings, Target Audience). These panels allow you to quickly review and confirm your previous choices without leaving the current step.
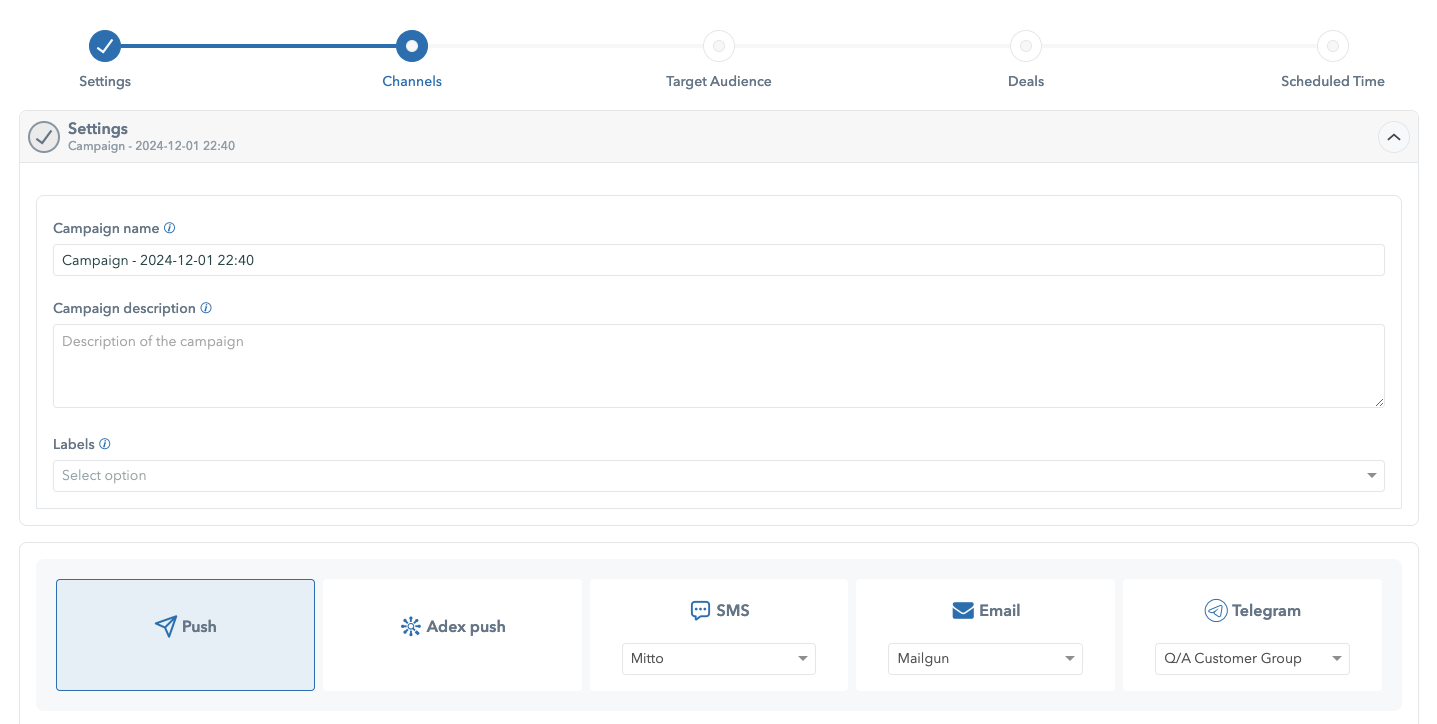
Expanded Panel Containing Information from Previous Step
Moving to the Next Step
Once you’ve completed these basic settings, click “Next” to move on to defining your target audience. This is where you’ll start to refine who will receive your campaign, allowing you to focus your efforts on the most relevant segments.
Step 3: Defining Your Target Audience
After setting up the basics of your campaign, the next crucial step is defining your target audience. This step allows you to specify who will receive your campaign based on various criteria such as geographic location, user ID, audience segments, and more.
Tailoring your campaign to the right audience is key to achieving better engagement and ensuring your message reaches the most relevant users.
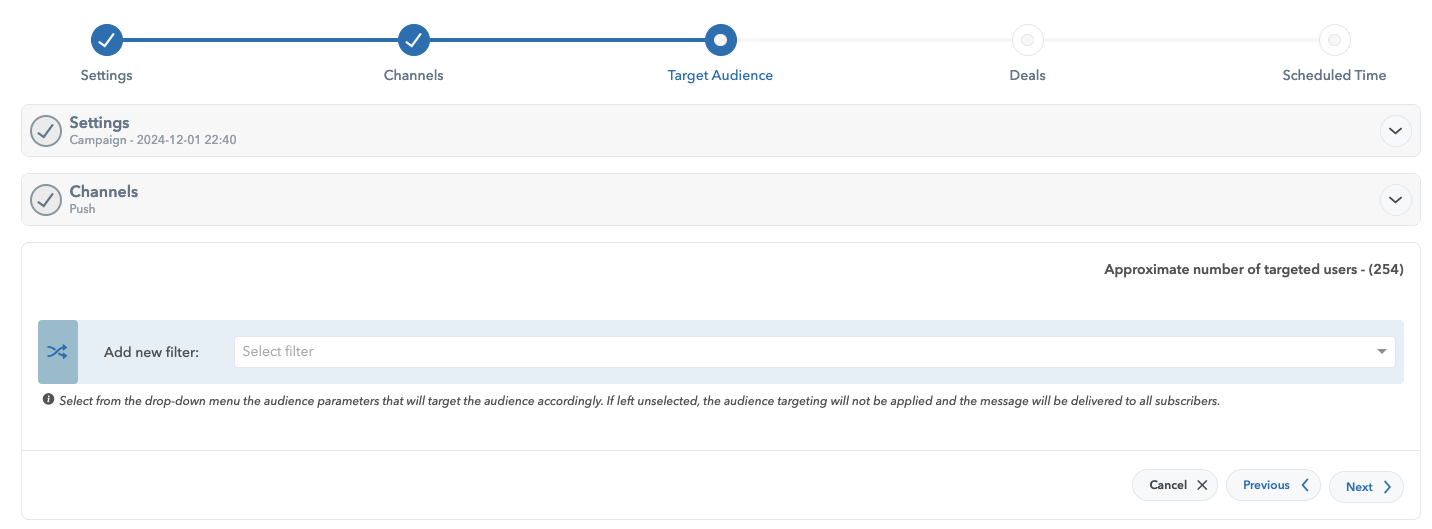
Initial Target Audience Display View
Adding Filters to Your Audience
You can add multiple filters to precisely define your target audience. Filters allow you to include or exclude users based on specific attributes such as region, remote user ID, language, as well as 15 targeting options available in total.
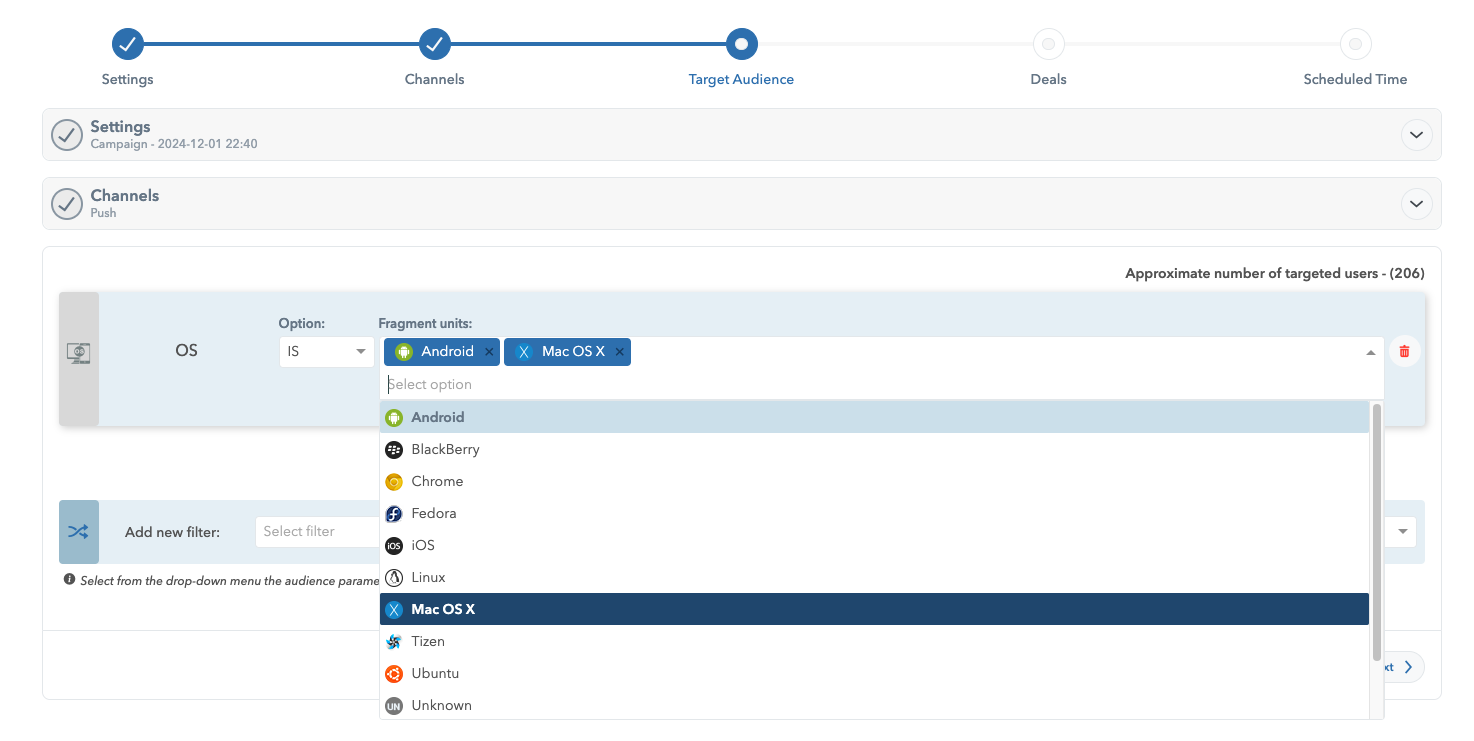
Audience Segments Add New Filter
Understanding Your Audience Size
As you define your target audience, you’ll see an approximate number of users that match the selected criteria. This helps you gauge the potential reach of your campaign and adjust your targeting strategy if needed.
A larger audience size indicates broader reach, while a smaller, more focused audience can lead to higher engagement rates.
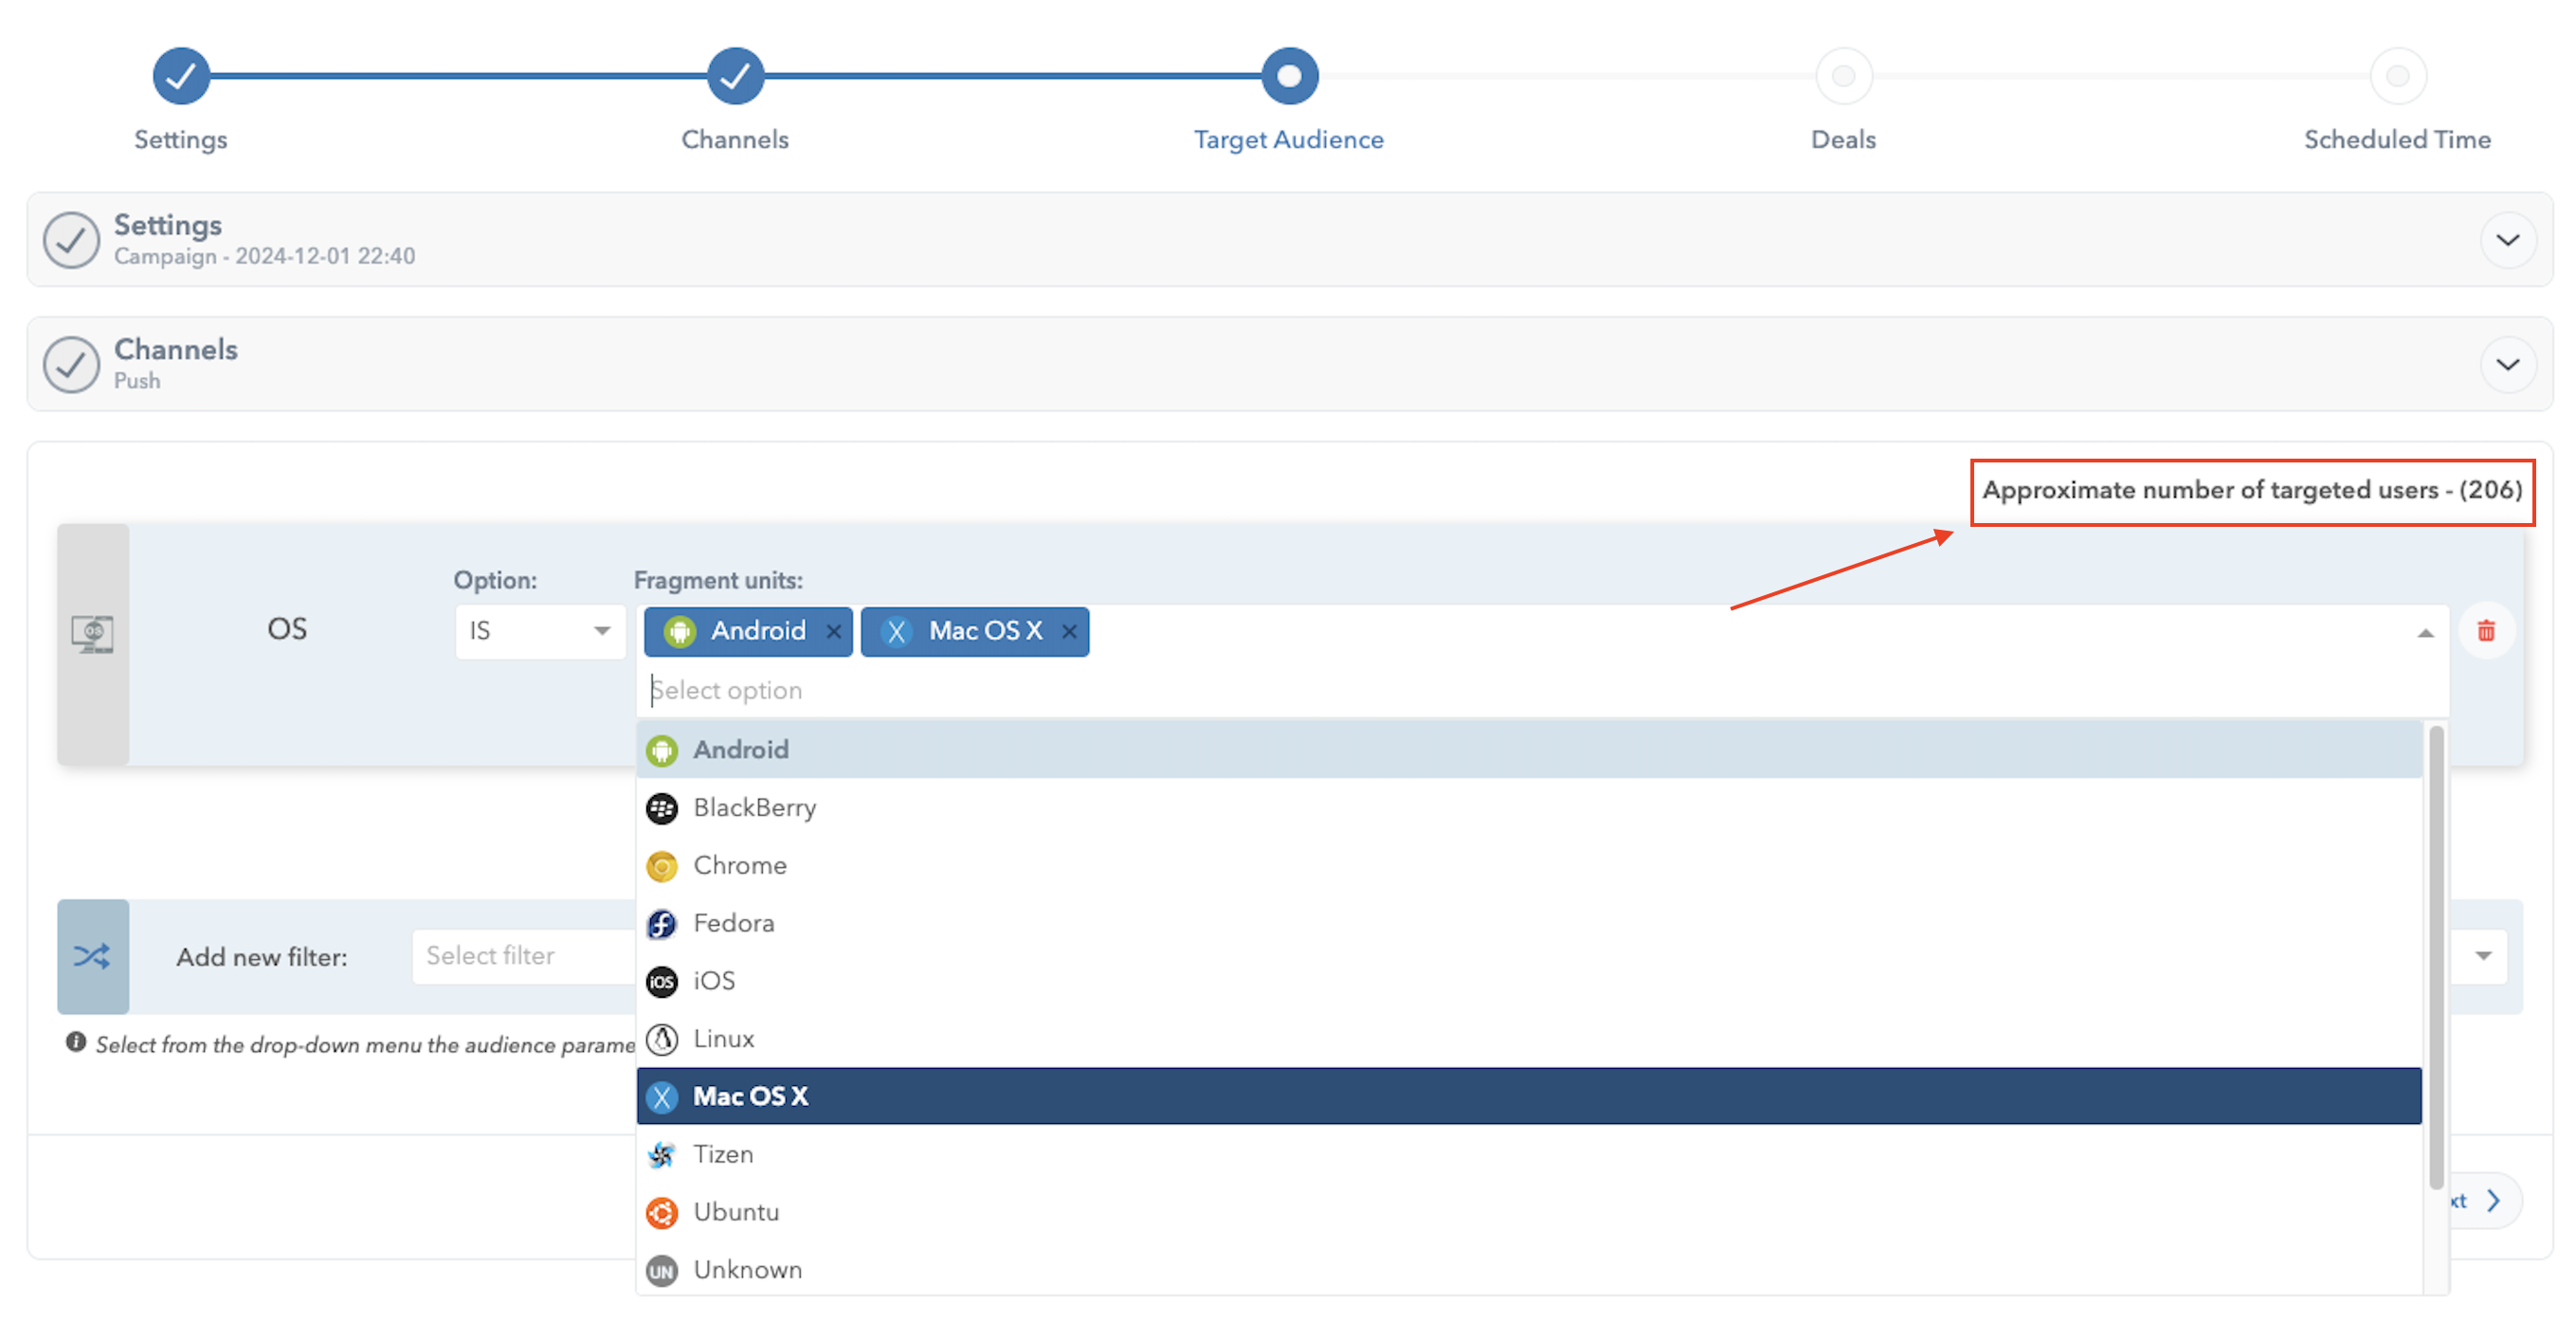
Approximate Number of Users Targeted Example

Finalizing Your Target Audience
Once you’ve added all the necessary filters, review your selections to ensure they align with your campaign goals. The “Next” button will move you to the channel selection step, where you’ll decide how to reach your audience through various communication channels.
Collapsed Panels and Summarized Information
Throughout the setup process, collapsed panels contain summarized information about the previous steps. These summaries allow you to quickly review your settings without leaving your current step, ensuring that everything is correctly configured as you move forward.
Proceeding to the Next Step: Deals and Scheduling
Once your channels are selected and templates are ready, click “Next” to move to the Deals and Scheduling steps. Here, you’ll finalize your campaign by setting up any deals associated with the campaign and scheduling the launch time.
Step 4: Selecting or Creating a Deal (Optional)
The “Deals” step in the campaign setup process is an optional yet powerful feature designed to optimize your campaign’s performance. Deals allow you to define specific conditions and pricing models that align with your marketing strategy, such as Cost Per Click (CPC), Cost Per Acquisition (CPA), or any other Deal Structure (there are 12 in total).
This step is particularly useful for campaigns that are tied to specific financial metrics or require advanced targeting based on device, country, or event-specific conditions.
If you require a detailed explanation of how to create, edit, and manage deals, please refer to the Deals documentation page.
As mentioned before, users can completely skip this step, rendering it optional. However, if the user performing scheduling decides to create or select an existing deal, they can do so by clicking on the Create or Select Deal dropdown and eigther select one of the precreated deals or create a new one.

Create or Select Deal Field Preview
Using an Existing Deal
If you have previously created deals, you can select one from the dropdown menu. This allows you to reuse established pricing models and conditions, ensuring consistency across your campaigns. When you select a deal, the system automatically populates the relevant fields with the details of that deal, including:
- Basic Information: The deal name, type, and owner.
- Payment Conditions: Pricing models such as CPC, CPA, or custom conditions.
- Advanced Conditions: Frequency capping, conversion windows, and other specific metrics.
- Country-Specific Pricing: Adjust pricing based on geographic location.
- Device-Specific Pricing: Tailor pricing for specific devices or platforms.
- Custom Conversion Events: Define specific events that trigger conversions and associated pricing.
Creating a New Deal
Users can create a deal from scratch, which will require that the previously mentioned information be provided during deal creation. To create a deal, select Add new deal. Once selected, the add deal component will require user inputs.

Create Deal Component Example
If you need a deal tailored specifically to your current campaign, you can create a new one by filling out the following sections:
- Basic Information: Start by naming your deal, selecting the advertiser, and choosing the deal type (e.g., CPC, CPA).
- Payment Conditions: Set the pricing model that best fits your campaign goals.
- Advanced Conditions: You can add additional conditions like frequency capping or conversion windows by clicking on “Show Advanced Conditions.” These options provide more granular control over how your deal operates, ensuring it aligns with your broader marketing strategy.
- Country-Specific Pricing: Add pricing rules based on the country or region of your audience. This is crucial for campaigns that need to consider economic factors or different market rates in various locations.
- Device-Specific Pricing: Define pricing for different devices or platforms, which is particularly useful for campaigns targeting mobile versus desktop users.
- Custom Conversion Events: If your campaign is focused on specific user actions (like form submissions or purchases), you can create custom conversion events and set prices for those events.
Finalizing the Deal
Once you’ve set up the deal parameters, you can save the deal for future use or proceed with it as part of your current campaign. This flexibility allows you to either use the deal immediately or keep it for other campaigns down the line.
Reviewing Previous Steps
As with other steps, you’ll see a summary of your previous configurations (Basic Settings, Target Audience, Channels) in the collapsed panels. This ensures you have an overview of the entire setup process and can make any adjustments as needed before finalizing the deal.

Collapsed Panels Deals Step Example
Proceeding to the Final Step: Scheduling
After setting up your deal, or if you’ve decided to skip this step, click “Next” to move on to the final step, where you will schedule your campaign. This step involves setting the launch date, time, and any recurring schedules if applicable.
Step 5: Scheduling Your Campaign
The final step in setting up your campaign is scheduling when it will be executed. This step allows you to define precise timings for when your campaign will start, end, and if it will recur based on specific patterns or intervals.
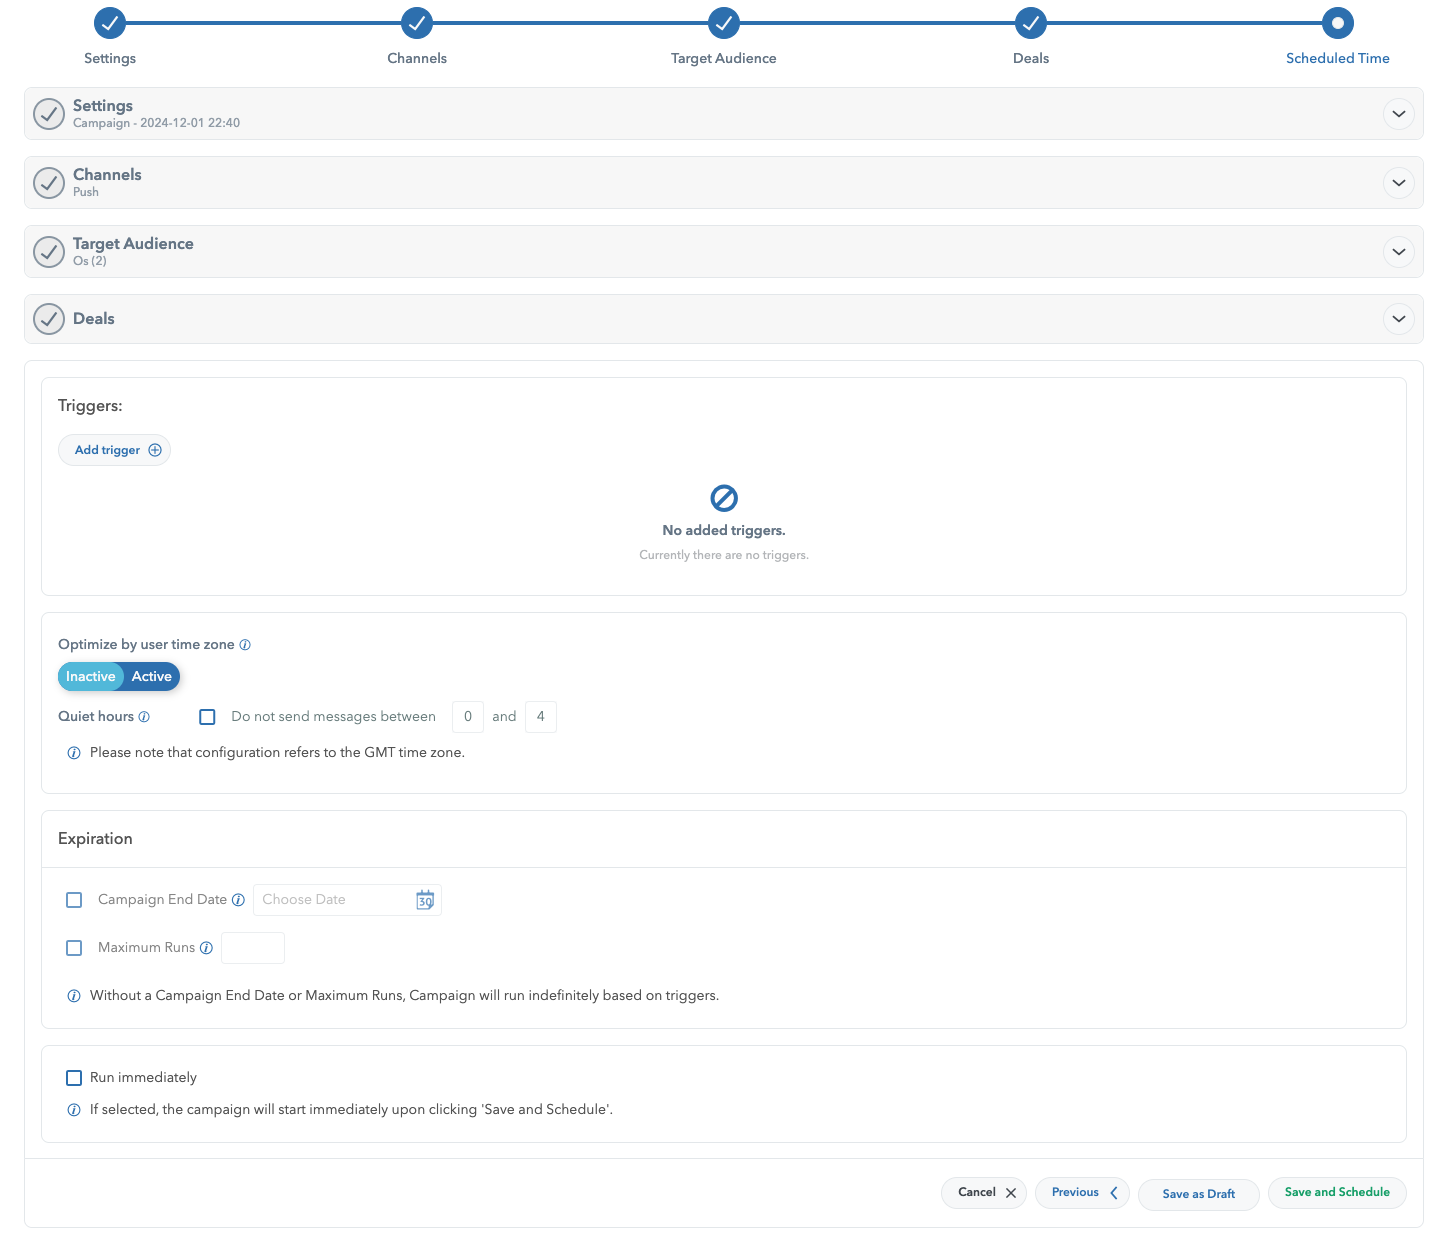
Scheduled Time Default View
Setting the Start Time
You can choose to start your campaign based on several trigger options:
Specific Time: Set a specific date and time for your campaign to begin. This is ideal for one-time events or campaigns that need to be launched at a particular moment.
Web Request (Webhook): Trigger the campaign when a web request is sent to a specified URL. This option is useful for campaigns that need to be tied to an external event or system.
Time Pattern: Create complex schedules where the campaign starts on specific days of the week, months, or even at specific intervals. This allows for repeated campaigns without needing to set them up individually each time.

Adding Triggers
Triggers add an additional layer of control over when your campaign actions are executed. Add triggers by using Add Trigger + button which will provide triggers such as:
- Time: Set the time of campaign scheduling by clicking on a date and time picker.

Time Trigger Enabled with Date & Picker Selected
- Time Pattern: Set recurring patterns based on days, weeks, or months.

Time Pattern Enabled with Hours, Times of Repetition for Months and Weekdays Selected
- Time Interval: Set the campaign to repeat at specific intervals, such as every few hours or days.

Time Interval Pattern Example: 2-Hour Repetition Selected
Each trigger can be customized to fit the exact needs of your campaign, ensuring that your messages are sent at the optimal times.
Optimizing by User Time Zone
To maximize engagement, you can choose to optimize the send times based on the user’s time zone. This means your messages will reach users at a time when they are most likely to engage, regardless of where they are in the world.

Optimize By User Time Zone option set to active
Configuring Quiet Hours
Quiet hours are a feature that allows you to avoid sending messages during times that might be inconvenient for your audience, such as late at night.
You can set specific hours during which no messages will be sent, ensuring that your campaign respects your audience’s time.

Quiet Hours Option Enabled
Final Review and Scheduling
Once you have set the triggers, start, and end times, you can:
Save as Draft: If you’re not ready to launch the campaign yet, save it as a draft. This allows you to return and make adjustments later. All drafted campaigns will be available under the Drafts tab in the Campaigns list view.
Save and Schedule: If everything is ready, you can save and schedule the campaign. This will finalize the setup and queue the campaign for execution according to the schedule you’ve defined. The campaign will be scheduled and set to Active status.
Scheduled campaigns can also be set to Inactive, Suspended, and Paused status. Such statuses are set once the campaign is either Drafted or Scheduled, and changes to the status can only be performed while editing the campaign in the list of all campaigns.
Expiration Options
The Expiration section allows you to control the duration and execution conditions of a campaign. Below are the available options:
Campaign End Date
Description: Specify an exact end date for the campaign.
How to Use: Select the checkbox next to “Campaign End Date.”
- Choose a date using the date picker.
Note: If no end date is set, the campaign will continue indefinitely, triggered by conditions or triggers set elsewhere.
Maximum Runs
Description: Set a limit for the total number of executions or runs of the campaign.
How to Use:
- Select the checkbox next to “Maximum Runs.”
- Enter the desired number of executions in the input field.
Note: If no limit is set, the campaign will run indefinitely based on triggers.

Run Immediately
- Description: Enables the campaign to start immediately upon saving and scheduling.
- How to Use:
- Select the checkbox next to “Run Immediately.”
- Save and schedule the campaign.
- Note: When this option is selected, the campaign will bypass any additional scheduling settings and start immediately.


Expiration & Run Immediately Options
Final Review: Collapsed Panels
Throughout this process, the collapsed panels from previous steps (Basic Settings, Target Audience, Channels, and Deals) are visible, allowing you to quickly review and confirm all your choices before the final launch.
Once the campaign is scheduled or drafted, users can head over to the campaigns list view and select the campaign to edit its settings.

Final Review of Collapsed Panels
Under the Settings tab of each campaign view, there will be collapsed panels for each step of the campaign scheduling chain. Simply click on any panel, and you will be provided with the previously inserted campaign scheduling information to change campaign settings retroactively.
Campaigns List Management
The Campaigns List section is designed to provide users with a comprehensive view of all campaigns. This section offers tools for managing campaigns efficiently, including the Copy Campaign feature.

Campaing List Example
Campaign Panel Options
Each campaign panel in the list provides the following options accessible via the three-dot menu:
- Edit Status:
- Allows users to update the campaign status via a dropdown menu with the following options:
- Active
- Inactive
- Suspended
- Paused
- Allows users to update the campaign status via a dropdown menu with the following options:

Edit Status Campaing List
Add Cost
- Opens a modal where users can input:
- Name: A label for the cost entry.
- Value: The monetary value of the cost.
- Date: The date associated with the cost entry.
- The entered cost value will be reflected in the campaign’s profit/loss flag.

Add Campaign Cost Options
Add Revenue
- Opens a modal identical to the Add Cost modal but allows users to add revenue. When confirmed:
The profit flag will update based on the entered revenue, showing a positive or negative value.
For example:
- Adding 5000 revenue will display Profit - $5000 (in green if positive).
- Adding 5000 cost will deduct from profit, displaying Profit - $5000 (in red if negative).

Capaign Profit Flag Example
Archive
- Moves the campaign to the Archived tab, making it inactive but retaining its data for future reference.

Campaign List Archive Tab Location
Copy Campaign
Each campaign panel in the list now includes a Copy option, as shown below:

Campaign List Copy Campaign Location
The same can be perfromed if you click on a campaign title in the list and use the option in the campaing view:

Campaign List Copy Campaign Location
When you click the Copy button, a modal will open, identical to the campaign creation flow, but with all fields prefilled using the data from the original campaign. This allows you to duplicate a campaign with ease while making any necessary adjustments.

Campaign Copy Window Example
Steps for Copying a Campaign:
- Click Copy: Locate the campaign you wish to duplicate and click the Copy button.
- Edit Prefilled Data (Optional): Review the prefilled fields in the modal. If necessary, make changes by navigating through the steps using the Next button.
- Save and Schedule: At the final step, click Save and Schedule to complete the process. A new campaign, identical to the original, will be created unless manual changes are applied.
This feature streamlines the process of creating similar campaigns, saving time and reducing the risk of errors. Users retain the flexibility to modify any part of the copied campaign before finalizing.
Note: The copied campaign will include all data from the original, including target audience, channels, and scheduled times. Ensure you review these details if changes are needed.
Managing Your Campaign List
The Campaigns List view categorizes campaigns into three tabs:
- Live: Active campaigns currently running.
- Finished: Completed campaigns.
- Archived: Campaigns that are no longer active or relevant.
You can quickly filter, search, and manage your campaigns using the tools provided in this view.
This structured view ensures easy navigation and management, allowing you to focus on optimizing your campaign strategies.
